
ES/ Bloquea el tracking invisible con Pi-hole // EN/ Block invisible tracking with Pi-hole
ES/ Aquí el boletín que hace referencia a este post. // EN/ Here is the newsletter which refers to this post.
🇪🇸 Español
Introducción
Esta guía te enseña a convertir una Raspberry Pi en un bloqueador de anuncios y trackers para toda tu red doméstica. Sin servicios externos ni cuotas mensuales.
Lo que vas a conseguir:
- Bloquear trackers invisibles (Google Analytics, Facebook Pixel…)
- Eliminar redes de anuncios (DoubleClick, Criteo, Taboola…)
- Cortar telemetría no deseada (Windows, Smart TVs, Apple…)
- Protección contra malware y phishing
Importante: Pi-hole bloquea a nivel DNS, lo que significa que NO puede bloquear anuncios de YouTube (por ejemplo, ya que provienen del mismo dominio que los vídeos). Para eso necesitarás un navegador al que instalar la extensión uBlock Origin, personalmente uso Librewolf (que ya la trae de serie), un fork de Firefox pensado en la privacidad y/o Brave, un fork de Chromium que en lugar de uBlock, usa su propio bloqueador de anuncios llamado Brave Shields.
Pi-hole y estos navegadores son capas totalmente complementarias.
Tiempo estimado: 1 hora
Dificultad: Principiante (sin miedo a la terminal)
Requisitos
- Raspberry Pi (cualquier modelo, hasta las de 512MB sirven)
- Wallapop/Milanuncios → 15-35€ (Por esos precios, casi seguro que son modelos viejos, pero si el estado es bueno te vale)
- Tarjeta microSD (8GB mínimo)
- Cargador USB (5V 2A)
- Cable ethernet (para conectarla al router)
- Teclado y pantalla HDMI (solo para el setup inicial)
- Tu ordenador (para controlarla por SSH después)
.
Conceptos básicos
¿Qué es DNS?
La “guía telefónica” de internet. Traduce google.com → 142.250.185.46
¿Qué hace Pi-hole?
Es un servidor DNS con lista negra. Cuando algo en tu red pregunta “¿dónde está ads.facebook.com?”, Pi-hole responde: “No se de que me hablas”
Paso 1: Preparar la tarjeta SD
Descarga Raspberry Pi Imager
- Conecta la SD a tu ordenador
- Abre Imager
- OS: Raspberry Pi OS (other) → Raspberry Pi OS Lite (32 o 64-bit, dependiendo de tu modelo)
- Storage: Tu SD
- Write → Espera 5-10 min
Una vez terminado, saca la SD de tu ordenador.
Paso 2: Primer arranque con teclado y pantalla
- Inserta la SD en la Pi
- Conecta el cable ethernet de la Pi al router
- Conecta un teclado USB y un cable HDMI a una pantalla
- Enchufa el cargador
- Espera a que arranque (verás texto en la pantalla)
Primera vez tendrás que crear: Usuario y Contraseña (apúntala bien).
Paso 3: Habilitar SSH (Secure Shell)
Una vez dentro de la Pi (con teclado y pantalla conectados):
sudo raspi-config
Navega con las flechas del teclado:
- Interface Options
- SSH
- Yes (habilitar)
- Finish
Ahora averigua la IP de tu Pi:
hostname -I
Te dará algo como 192.168.1.50 → Apúntala
Ya puedes apagar la Pi, desconectar teclado y pantalla:
sudo shutdown now
Después vuelve a enchufarla, solo con el cable ethernet conectado a tu router.
Paso 4: Conectarte por SSH desde tu ordenador
Ahora que la Pi está sin teclado ni pantalla (solo cable ethernet), contrólala desde tu ordenador.
Nota rápida sobre SSH:
- Linux/Mac: SSH viene preinstalado, solo abre la terminal
- Windows 10/11 recientes: SSH viene preinstalado, abre PowerShell o CMD
- Windows antiguo: Descarga PuTTY si
sshno funciona
Abre terminal en tu ordenador y conéctate:
ssh pi@IP-QUE-ANOTASTE
Ejemplo:
ssh pi@192.168.1.50
- Primera vez te pregunta si confías → escribe
yes - Introduce la contraseña que configuraste
¡Ya estás dentro! El resto de pasos los harás desde aquí.
Paso 5: Actualizar sistema
sudo apt update && sudo apt upgrade -y
Tarda 5-10 min.
Paso 6: Instalar Pi-hole
curl -sSL https://install.pi-hole.net | bash
Wizard interactivo (responde con las flechas):
| Pregunta | Respuesta |
|---|---|
| Static IP? | Continue |
| Upstream DNS | Quad9 (filtered, DNSSEC) ← Recomendado |
| IPv4/IPv6 | IPv4 (o ambos) |
| Static IP confirm | Yes |
| Web interface | Yes |
| Web server | Yes |
| Log queries | Yes (Show everything) |
| Privacy mode | Show everything (0) |
Al final te da una contraseña → ¡GUÁRDALA!
Paso 7: Añadir listas de bloqueo
Por defecto Pi-hole viene sin listas. Vamos a añadir una manualmente desde el panel web:
- Abre en tu navegador:
http://IP-DE-TU-PI/admin - Login con la contraseña que te dio al instalar
- Group Management → Adlists
- Pega esto en Address:
https://raw.githubusercontent.com/StevenBlack/hosts/master/hosts - Add
- Tools → Update Gravity → Update
Verificar que funciona:
Vuelve a la terminal SSH de tu Pi y escribe:
sudo pihole -q doubleclick.net
Debería decir que está en la lista de bloqueo.
Paso 8: Configurar tu router para usar Pi-hole
Ahora viene la magia: hacer que todos los dispositivos de tu red usen Pi-hole como DNS.
IMPORTANTE: Pi-hole NO afecta automáticamente a todos tus dispositivos. Solo funcionará en aquellos que obtengan su DNS desde el router. Si algún dispositivo tiene configurado manualmente un DNS (como 8.8.8.8 de Google), ese dispositivo NO pasará por Pi-hole.
Configura el router:
Ten en cuenta: La interfaz del router varía mucho dependiendo de la marca y modelo. Los nombres de las opciones pueden ser diferentes, pero el concepto es el mismo: buscar donde se configura el DNS.
- Accede al panel de tu router
- Normalmente:
192.168.1.1o192.168.0.1 - Usuario/contraseña: Si no los sabes, mira en la etiqueta del router (puede estar en la parte de abajo, tendrás que darle la vuelta)
- Normalmente:
- Busca la sección DHCP / LAN / DNS
- Cada router es diferente, pero busca algo como:
- “DHCP Server”
- “LAN Settings”
- “DNS Settings”
- “Primary DNS” / “Secondary DNS”
- Cada router es diferente, pero busca algo como:
- Configura los DNS:
- DNS Primario: IP de tu Pi (ejemplo:
192.168.1.50) - DNS Secundario: La misma IP de tu Pi (ejemplo:
192.168.1.50)
- DNS Primario: IP de tu Pi (ejemplo:
- Guarda y reinicia el router
Crucial sobre DNS secundario:
Mucha gente piensa que el DNS secundario es un “backup” por si el primario falla. Eso NO es cierto. Los dispositivos pueden usar cualquiera de los dos DNS aleatoriamente. Si pones 8.8.8.8 en el secundario, muchas queries irán directamente a Google y Pi-hole no las verá (ni las bloqueará).
Por eso es FUNDAMENTAL poner la IP de tu Pi tanto en primario como en secundario.
Configurar también tus dispositivos:
En mi experiencia, configurar solo el router NO fue suficiente. También tuve que configurar el DNS manualmente en cada dispositivo (ordenador, móvil, tablet…).
Cómo hacerlo depende del sistema operativo:
- Linux: Configuración de red → Tu conexión → IPv4 → DNS → Añadir IP de tu Pi
- Windows: Panel de Control → Centro de redes → Adaptador → Propiedades → IPv4 → DNS → Añadir IP de tu Pi
- Mac: Preferencias del Sistema → Red → Tu conexión → Avanzado → DNS → Añadir IP de tu Pi
- Android/iOS: Ajustes WiFi → Tu red → Configurar DNS → Manual → Añadir IP de tu Pi
Importante: En todos los casos, si hay opción de DNS primario y secundario, pon la IP de tu Pi en ambos.
Paso 9: Verificar que funciona
Test 1:
nslookup doubleclick.net
Debe salir:
Server: 192.168.1.50  (tu Pi)
Address: 0.0.0.0      (bloqueado)
Si sale otro servidor → tu dispositivo NO usa Pi-hole.
Test 2:
Visita http://doubleclick.net en el navegador → debería dar error.
Test 3:
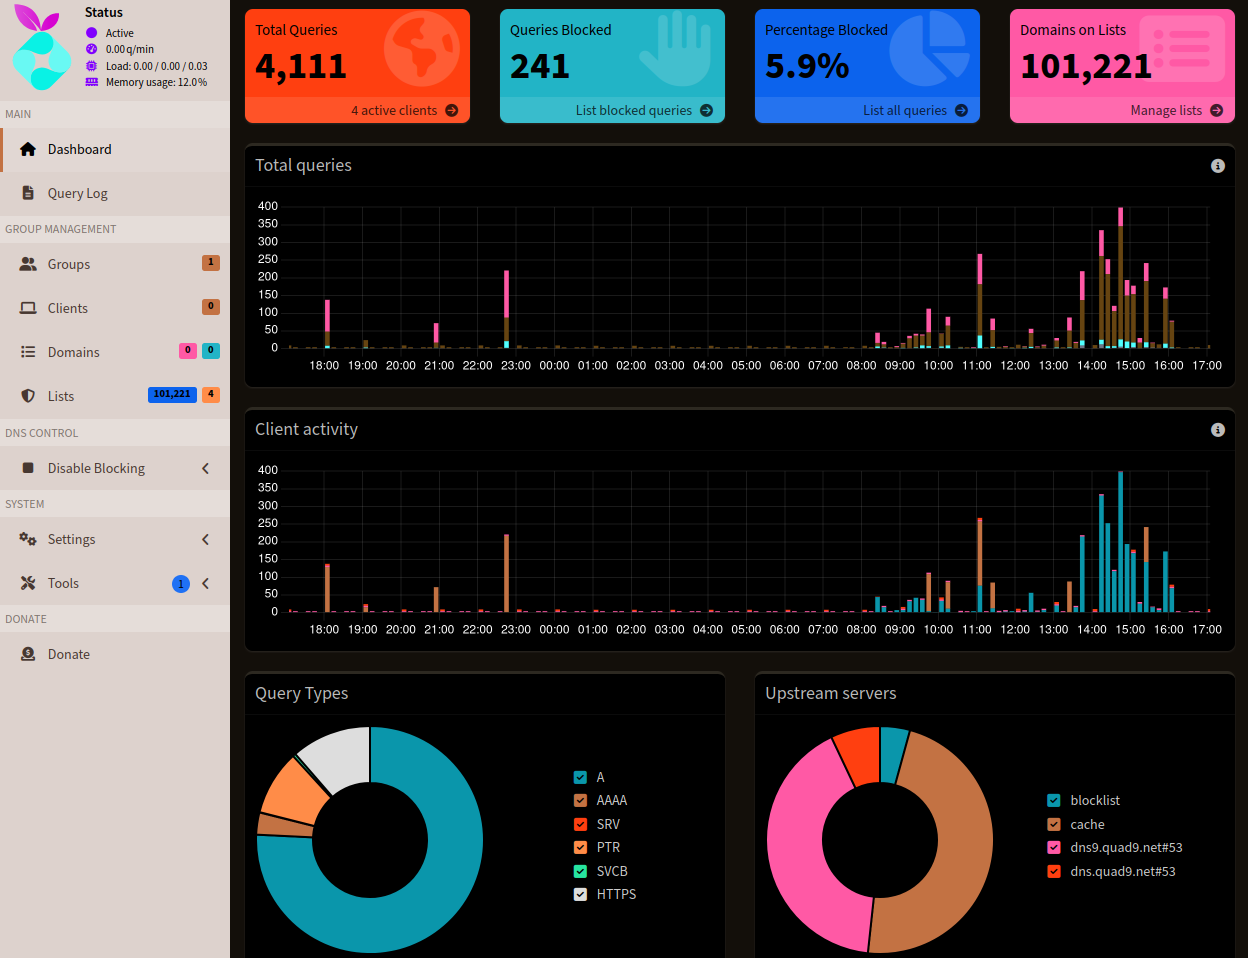
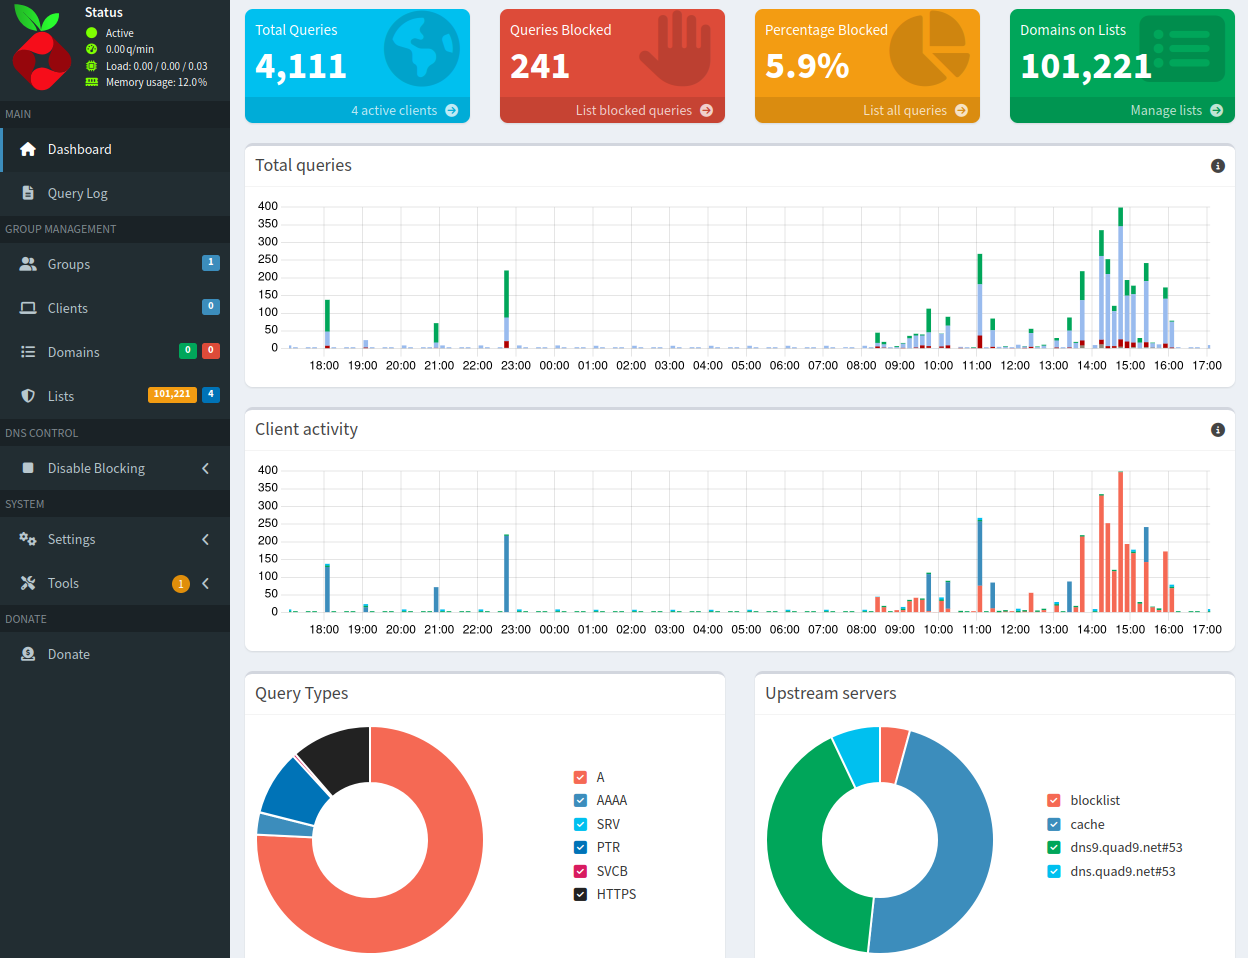
Panel web http://IP-PI/admin → Tools → Query Log
Navega por internet y verás líneas:
- Permitidas
- Bloqueadas ← ¡Esto es lo que quieres ver!
Gestión y solución de problemas
Comandos básicos que necesitarás:
pihole status              # Ver estado de Pi-hole
sudo pihole -g             # Actualizar listas de bloqueo (hazlo 1 vez al mes)
pihole -q dominio.com      # Comprobar si un dominio está bloqueado
pihole -w dominio.com      # Añadir a whitelist (desbloquear)
pihole -t                  # Ver queries en tiempo real
pihole -up                 # Actualizar Pi-hole a última versión
Problemas comunes:
-
Mis dispositivos no usan Pi-hole: Reinicia router y dispositivos. Verifica que configuraste el DNS correctamente (IP de la Pi en primario Y secundario).
-
Firefox ignora Pi-hole: Tiene DNS-over-HTTPS activado. Desactívalo: Firefox → Configuración → Buscar “DNS” → DNS sobre HTTPS: Desactivado
-
Una web/app dejó de funcionar: Falso positivo. Desde panel web: Query Log → Click en el dominio bloqueado → Whitelist. O por terminal:
pihole -w dominio-legitimo.com
Mantenimiento regular:
- Actualiza listas 1 vez al mes:
sudo pihole -g - Haz backup de tu configuración: Panel web → Settings → Teleporter → Backup
Bonus: Pi-hole + Tailscale (úsalo fuera de casa)
Si hiciste mi guía anterior de Nextcloud + Tailscale, ya tienes Tailscale configurado. Puedes hacer que Pi-hole funcione incluso fuera de casa (trabajo, hotel, datos móviles).
Setup rápido:
# 1. Instala Tailscale en la Pi
curl -fsSL https://tailscale.com/install.sh | sh
sudo tailscale up

# 2. Apunta la IP Tailscale de tu Pi (100.x.x.x)
- Ve a login.tailscale.com/admin/dns y añade esa IP como DNS.
Resultado: Tracking bloqueado estés donde estés.
⚠️ Si Tailscale interfiere con Pi-hole local: sudo tailscale set --accept-dns=false
Fin
Ya tienes tu propio bloqueador de anuncios y trackers funcionando en una Raspberry Pi reciclada. Sin cuotas, sin servicios de terceros, 100% bajo tu control.
Ahora descubre qué empresas te seguían sin que lo supieras. Entra al Query Log y prepárate para sorprenderte.
Si tienes cualquier duda, estaré encantado de que contactes conmigo e intentemos resolver cualquier problema que te surja.
Lo invisible se hace visible
Recursos
- Docs oficiales: https://docs.pi-hole.net/
- Comunidad: https://reddit.com/r/pihole
- Mi guía anterior: Nextcloud + Tailscale + Navidrome
🇬🇧 English
Introduction
This guide will walk you through converting a Raspberry Pi into an ad and tracker blocker for your entire home network. No external services, no monthly fees.
What you’ll achieve:
- Block invisible trackers (Google Analytics, Facebook Pixel…)
- Eliminate ad networks (DoubleClick, Criteo, Taboola…)
- Cut unwanted telemetry (Windows, Smart TVs, Apple…)
- Protection against malware and phishing
Important: Pi-hole blocks at the DNS level, which means it CANNOT block YouTube ads (for example, since they come from the same domain as the videos). For that you’ll need a browser with uBlock Origin extension, I personally use Librewolf (which comes with it by default), a Firefox fork focused on privacy and/or Brave, a Chromium fork that instead of uBlock, uses its own ad blocker called Brave Shields.
Pi-hole and these browsers are completely complementary layers.
Estimated time: 1 hour
Difficulty: Beginner (not afraid of the terminal)
Requirements
- Raspberry Pi (any model, even 512MB ones work)
- Second-hand → $15-35 (At these prices, they’re almost certainly old models, but if they’re in good condition they’ll work)
- microSD card (8GB minimum)
- USB charger (5V 2A)
- Ethernet cable (to connect to router)
- Keyboard and HDMI monitor (only for initial setup)
- Your computer (to control it via SSH afterwards)
.
Basic concepts
What is DNS?
The internet’s “phone book”. It translates google.com → 142.250.185.46
What does Pi-hole do?
It’s a DNS server with a blacklist. When something on your network asks “where is ads.facebook.com?”, Pi-hole responds: “I don’t know what you’re talking about”
Step 1: Prepare the SD card
Download Raspberry Pi Imager
- Connect the SD to your computer
- Open Imager
- OS: Raspberry Pi OS (other) → Raspberry Pi OS Lite (32 or 64-bit, depending on your model)
- Storage: Your SD
- Write → Wait 5-10 min
Once finished, remove the SD from your computer.
Step 2: First boot with keyboard and monitor
- Insert the SD into the Pi
- Connect the ethernet cable from Pi to router
- Connect a USB keyboard and HDMI cable to a monitor
- Plug in the charger
- Wait for boot (you’ll see text on screen)
First time you’ll need to create: Username and Password (write it down).
Step 3: Enable SSH (Secure Shell)
Once inside the Pi (with keyboard and monitor connected):
sudo raspi-config
Navigate with arrow keys:
- Interface Options
- SSH
- Yes (enable)
- Finish
Now find your Pi’s IP:
hostname -I
You’ll get something like 192.168.1.50 → Write it down
Now you can shut down the Pi, disconnect keyboard and monitor:
sudo shutdown now
Then plug it back in, only with ethernet cable connected to your router.
Step 4: Connect via SSH from your computer
Now that the Pi is running without keyboard or monitor (only ethernet cable), control it from your computer.
Quick note about SSH:
- Linux/Mac: SSH comes pre-installed, just open the terminal
- Windows 10/11 (recent): SSH comes pre-installed, open PowerShell or CMD
- Older Windows: Download PuTTY if
sshdoesn’t work
Open terminal on your computer and connect:
ssh pi@IP-YOU-NOTED
Example:
ssh pi@192.168.1.50
- First time it asks if you trust it → type
yes - Enter the password you configured
You’re in! The rest of the steps you’ll do from here.
Step 5: Update system
sudo apt update && sudo apt upgrade -y
Takes 5-10 min.
Step 6: Install Pi-hole
curl -sSL https://install.pi-hole.net | bash
Interactive wizard (answer with arrows):
| Question | Answer |
|---|---|
| Static IP? | Continue |
| Upstream DNS | Quad9 (filtered, DNSSEC) ← Recommended |
| IPv4/IPv6 | IPv4 (or both) |
| Static IP confirm | Yes |
| Web interface | Yes |
| Web server | Yes |
| Log queries | Yes (Show everything) |
| Privacy mode | Show everything (0) |
At the end it gives you a password → SAVE IT!
Step 7: Add blocklists
By default Pi-hole comes without lists. Let’s add one manually from the web panel:
- Open in your browser:
http://YOUR-PI-IP/admin - Login with the password it gave you during installation
- Group Management → Adlists
- Paste this in Address:
https://raw.githubusercontent.com/StevenBlack/hosts/master/hosts - Add
- Tools → Update Gravity → Update
Verify it works:
Go back to your Pi’s SSH terminal and type:
sudo pihole -q doubleclick.net
It should say it’s on the blocklist.
Step 8: Configure your router to use Pi-hole
Now comes the magic: making all devices on your network use Pi-hole as DNS.
IMPORTANT: Pi-hole does NOT automatically affect all your devices. It will only work on those that get their DNS from the router. If any device has a DNS manually configured (like Google’s 8.8.8.8), that device will NOT go through Pi-hole.
Configure the router:
Take into account: The router interface varies a lot depending on brand and model. Option names may be different, but the concept is the same: find where DNS is configured.
- Access your router’s panel
- Usually:
192.168.1.1or192.168.0.1 - Username/password: If you don’t know them, check the router label (might be on the bottom, you’ll need to flip it over)
- Usually:
- Find the DHCP / LAN / DNS section
- Each router is different, but look for something like:
- “DHCP Server”
- “LAN Settings”
- “DNS Settings”
- “Primary DNS” / “Secondary DNS”
- Each router is different, but look for something like:
- Configure DNS:
- Primary DNS: Your Pi’s IP (example:
192.168.1.50) - Secondary DNS: The same Pi IP (example:
192.168.1.50)
- Primary DNS: Your Pi’s IP (example:
- Save and restart router
Crucial about secondary DNS:
Many people think secondary DNS is a “backup” in case the primary fails. That’s NOT true. Devices can use either DNS randomly. If you put 8.8.8.8 in secondary, many queries will go directly to Google and Pi-hole won’t see them (or block them).
That’s why it’s ESSENTIAL to put your Pi’s IP in both primary and secondary.
Also configure your devices:
In my experience, configuring only the router was NOT enough. I also had to manually configure the DNS on each device (computer, phone, tablet…).
How to do it depends on the operating system:
- Linux: Network settings → Your connection → IPv4 → DNS → Add your Pi’s IP
- Windows: Control Panel → Network Center → Adapter → Properties → IPv4 → DNS → Add your Pi’s IP
- Mac: System Preferences → Network → Your connection → Advanced → DNS → Add your Pi’s IP
- Android/iOS: WiFi settings → Your network → Configure DNS → Manual → Add your Pi’s IP
Important: In all cases, if there’s an option for primary and secondary DNS, put your Pi’s IP in both.
Step 9: Verify it works
Test 1:
nslookup doubleclick.net
Should show:
Server: 192.168.1.50  (your Pi)
Address: 0.0.0.0      (blocked)
If it shows another server → your device is NOT using Pi-hole.
Test 2:
Visit http://doubleclick.net in browser → should error out.
Test 3:
Web panel http://PI-IP/admin → Tools → Query Log
Browse the internet and you’ll see lines:
- Allowed
- Blocked ← This is what you want to see!
Management and troubleshooting
Basic commands you’ll need:
pihole status              # Check Pi-hole status
sudo pihole -g             # Update blocklists (do it once a month)
pihole -q domain.com       # Check if a domain is blocked
pihole -w domain.com       # Add to whitelist (unblock)
pihole -t                  # View queries in real-time
pihole -up                 # Update Pi-hole to latest version
Common issues:
-
My devices don’t use Pi-hole: Restart router and devices. Verify you configured DNS correctly (Pi’s IP in both primary AND secondary).
-
Firefox ignores Pi-hole: It has DNS-over-HTTPS enabled. Disable it: Firefox → Settings → Search “DNS” → DNS over HTTPS: Disabled
-
A website/app stopped working: False positive. From web panel: Query Log → Click blocked domain → Whitelist. Or via terminal:
pihole -w legitimate-domain.com
Regular maintenance:
- Update lists once a month:
sudo pihole -g - Backup your configuration: Web panel → Settings → Teleporter → Backup
Bonus: Pi-hole + Tailscale (use it outside home)
If you did my previous Nextcloud + Tailscale guide, you already have Tailscale configured. You can make Pi-hole work even outside home (work, hotel, mobile data).
Quick setup:
# 1. Install Tailscale on Pi
curl -fsSL https://tailscale.com/install.sh | sh
sudo tailscale up

# 2. Note down your Pi's Tailscale IP (100.x.x.x)
- Go to login.tailscale.com/admin/dns and add that IP as DNS.
Result: Tracking blocked wherever you are.
If Tailscale interferes with local Pi-hole: sudo tailscale set --accept-dns=false
Done
You now have your own ad and tracker blocker running on a recycled Raspberry Pi. No fees, no third-party services, 100% under your control.
Now discover which companies were tracking you without you knowing. Enter the Query Log and prepare to be surprised.
If you have any questions, I’ll be happy if you get in touch and we’ll try to solve any issues you might have together.
The invisible becomes visible
Resources
- Official docs: https://docs.pi-hole.net/
- Community: https://reddit.com/r/pihole
- My previous guide: Nextcloud + Tailscale + Navidrome